

Rear Main Seal Repair Charger?
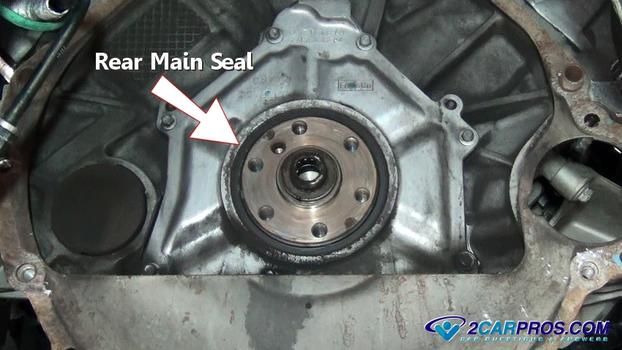
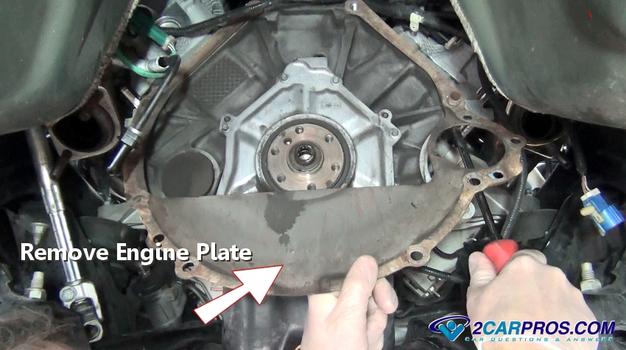
Your machine's engine rear main crankshaft seal is designed to give the engine oil leak protection from betwixt the crankshaft output flange and the engine cake. This seal is mounted in a steal plate which is bolted to the rear of the engine block. Every bit the crankshaft turns this seal rides against the seal hub which is designed to be smooth as likewise not damage the seal lip which is made of prophylactic. This seal is located betwixt the engine and transmission merely behind the flywheel. Rut and engine vibration is responsible for causing the rear main seal to fail. This is because the seal is made of prophylactic and tin can become hard and brittle causing the lip of the seal to fail allowing engine oil to bypass the seal and leak outside of the engine. When this trouble occurs engine oil volition leak into the transmission bong housing which will show up at the most downwardly function of transmission most the flywheel. If the motorcar is equipped with a standard transmission is will contaminate the clutch disc causing the clutch to catch and not disengage. This repair job is usual fairly expensive since the transmission and flywheel will need to be removed. The seal itself will cost between $13.00 and $35.00 on Amazon and that is pretty much all you will need beside maybe a small amount of transmission fluid. If you are having the job done at a repair garage or dealer y'all can await to pay betwixt $650.00 and $850.00 for the labor depending if the motorcar is front or rear wheel drive in most cases. A front principal seal is much easier and less expense to supplant. SPONSORED LINKS There is a video of the job being done at the bottom of this guide. Beginning by raising the car on four jack stands using a floor jack. Put the car as high as possible to requite you more room under the car which will assist make the job easier. Wear protective eye wear and gloves earlier getting started. This task will vary depending on if it'southward a forepart wheel or rear bike drive motorcar. Some steps like removing the exhaust organization may or may not demand to exist washed equally well. 1. Disconnect the Battery When removing the transmission you lot will demand to remove the starter in the procedure so you should disconnect the battery'southward negative cable to avert brusk circuits. ii. Remove the Frazzle System SPONSORED LINKS The engine will need to tip downward to allow enough room for the manual to be removed. Also, if the exhaust arrangement is in the fashion of the manual coming out the exhaust volition demand to exist partially or completely removed. 3. Remove the Driveshaft or CV Axles No matter if the motorcar is front bike or rear wheel drive, automatic or stick shift the driveshaft or CV beam will need to be removed to let clearance for the transmission removal. 4. Remove the Manual At that place is non that large of deviation if the transmission is automatic or stick shift when attempting to remove the transmission. The primary difference is an automatic transmission will accept ii libation lines running up the the radiator which will need to exist undone using a line wrench and the torque converter volition need to be unbolted from the flex plate. SPONSORED LINKS five. Remove the Flywheel or Flex Plate A machine equipped with a standard transmission volition accept a clutch and flywheel that volition demand to be removed before replacing the rear main seal. A car quipped with an automatic transmission will need to have the flex plate removed which is easier because it just unbolts from rear of the crankshaft. vi. Remove the Rear Main Seal Housing Bolts Now that those boosted jobs are out of the way you can get down to replacing the rear principal seal. Like we said, most of the job is getting to the seal but now that you have gotten this far let'southward continue with the job. The paradigm below shows what a typical rear main seal looks like pressed into its housing bolted to the rear of the engine cake. The cylindrical metal piece sitting in the center of the seal is the crankshaft which is the office that turns when the engine is running. In that location is a smaller piece in the center of this crankshaft which is a airplane pilot bearing which will be included on rear wheel bulldoze stick shift cars only. This seal was not leaking too desperately but since we where replacing the clutch anyway we decided at present would be the time to supervene upon the seal. Some application will take a thin metal plate betwixt the engine and manual which will need to be removed earlier you can remove the rear main seal. Use a large screw commuter or pry bar to remove the engine plate to clear access for the rear primary seal housing. SPONSORED LINKS There may or may not be will be 2 or four oil pan bolts that go through the oil pan and up into the rear mails seal'south housing. Remove these bolts 10mm, 12mm or 13mm bolts and put them in a container for safe keeping. The seal housing will have a series of 6 to 8, 8mm or 10mm bolts holding the rear principal seal housing to the rear of the engine cake. Remove the bolts by turning them counterclockwise and also put them in a container for safe keeping. Now the seal housing will be able to exist removed. Using a large standard screwdriver gently pry the housing loose from the engine cake. As you work effectually the edges of the housing elevator with your other hand using a rocking motion. It can be a little stuck because the housing is mounted on dowels in the block. Now the housing will come up loose from the engine block. Be careful not the driblet the housing because it is aluminum and can crack if information technology hits the ground hard enough. This part will demand to be cleaned before information technology can be reinstalled. SPONSORED LINKS 7. Remove the Rear Primary Crankshaft Seal Unremarkably the seal will come off with the housing only sometimes they can get stuck on the crankshaft. Without scoring the crankshaft gently pry the seal servant until its removed. This particular seal has a plastic retainer that is meant to give an added layer of protection to the seal. Hither is what the seal retainer looks like when removed. It is a simple plastic ring that pushes into place once the seal in installed. This retainer is designed to keep the seal from moving while in operation. Now remove the rear main seal past hand from the crankshaft hub. SPONSORED LINKS 8. Friction match the New Rear Crankshaft Seal Match the new rear primary seal to the former unit, they should lucifer identically in size. Some rear main seals can be redesigned from the factory and might be slightly unlike in appearance but should withal have the same inner and outer diameters. Please spotter this video of the task being done, then go along downwards the guide to glean additional helpful information. 9. Install the New Seal into the Seal Housing This part is of import: The management the rear main seal is installed will mean the difference betwixt the seal working or leaking. The lip of the seal must go toward the engine and over the crankshaft without damage. Some seals will come up with an installation tool which is a sparse plastic ring that the seal sides over the crankshaft hub. SPONSORED LINKS Employ a gasket scraper and carburetor cleaner remove all the old gasket material, oil and grime from the seal housing. Once the seal housing has been cleaned thoroughly gently and correctly in place the seal in the housing. In the image below the lip of the seal is facing upward. Using a apartment piece of mild steel and a hammer positioned above the seal, gently just evenly hammer the seal into place. You lot don't desire to have the seal go in at an angle because this will distort the seal and may cause it non to piece of work correctly. The seal will be completely installed when it is flush in the seal housing. Cheque the installation by running your finger around the seal feeling for evenness against the housing. Once the seal is installed apply a thin layer of sealant to both top and side sealing surfaces. Earlier doing this footstep prepare the block for the seal housing installation then the sealer does not start to dry. SPONSORED LINKS 10. Set the Block and Crankshaft Nosotros must now set up the cake to reinstall the seal housing and the rear main seal. Use a shop towel and carburetor cleaner to wipe clean the gasket surfaces while avoiding getting cleaner and debris into the oil pan. Position a textile over the oil pan to avoid debris getting into the pan while resurfacing the crankshaft seal hub. Employ a small piece of emery cloth or fine sand paper, about 400 grit. SPONSORED LINKS Utilise the emery cloth to polish the crankshaft journal this footstep is used to give the new seal a fresh surface to ride against. Finish past wiping down both the crankshaft and gasket surface free of oil and dirt and remove the cloth from the oil pan. Recheck the oil pan and block for cleanliness. All surfaces must exist oil free to seal properly. While lifting the oil pan gasket slightly apply sealer to the oil pan and gasket, and into the corner of the cake. SPONSORED LINKS xi. Install the Rear Main Seal Utilize a small amount of engine oil over the crankshaft seal hub surface before installing the seal. When installing the rear main seal housing along with the new seal, the lip of the seal must be lifted over the end of the crankshaft. The lip wants to fight information technology and so button one-half of the seal onto the crankshaft then pull it downwards and effectually to work the remainder of the seal into place. Exercise not use metal objects to help become the lip over the crankshaft this can damage the seal. Some seals are designed with an application sleeve which is removed after installation. After pushing the seal housing into identify, (sometimes tapping it with a hammer helps) reinstall all block and oil pan mounting bolts by hand to avert cross threading. Tighten the block side bolts in a star design kickoff and torque to manufactures specification which is ordinarily half dozen to viii pes pounds. Finish the installing of the seal housing by tightening the oil pan bolts to about the same torque setting. SPONSORED LINKS Place the seal retainer band into place over the crankshaft seal. Utilize a modest punch and hammer and evenly install the retainer back into place. Practice not over install this could push the seal out of the housing. And so reinstall the engine plate. The rear main seal job is now complete. Continue the reassembly of the flywheel, clutch and transmission. It is recommended when doing a job similar this to modify the oil and filter since the engine was open up and a small amount of dirt and grease could have failing into the oil pan. Here is the complete chore getting done including the exhaust, clutch flywheel and manual removal. Our certified technicians are fix to answer engine rear master seal questions for free. Nosotros promise y'all saved money and learned from this guide. Nosotros are creating a full ready of car repair guides. Please subscribe to our 2CarPros YouTube aqueduct and cheque back often for new videos which are uploaded regularly. Commodity published 2022-03-12 What Goes Wrong?
How Much Does It Cost?
Let's Get Started!


Watch the Video!


Watch the Video!
Questions?

Source: https://www.2carpros.com/articles/crankshaft-main-seal-replacement-rear
Posted by: irizarryriplat.blogspot.com
0 Response to "Rear Main Seal Repair Charger?"
Post a Comment